
Gear / Build / Weapon Bar interplay
 Update: this was written in Sept 2017 and some of the specific info is now out-dated, but the essentials remain valid.
I’ve shied away from writing a build guide, because I freely acknowledge I am neither a data-miner, nor a math girl, nor am I a master DPS. I can’t analyze the raw data for you, and I can’t pump out 55K DPS and then tell you how I did it.
But I have done hella research on DPS builds, and when I listen to people talk about their builds in chat I’ve noticed some common mistakes. For example, I’ve had convos in most of my guilds about why the War Maiden set isn’t a strong choice for Sorcerers. This isn’t going to be a pre-fab build, instead we’ll walk through an analysis of the build you’re using so you can strengthen it. I’ll focus on Sorcs, ‘cuz it’s what I know, but some of it will apply to other classes.
Add-Ons
To dig into builds, you have to have access to numbers the game doesn’t give you. I run CombatMetrix and Mitigation Percentage, but there are others; ask around. When you’re at the stage where you have different weapon bars and/or gear for specific situations, I highly recommend AlphaGear or Dressing Room, which allow you to create gear and weapon bar combinations and change them with a single hotkey.
Foundation Rules
There are a couple of foundation-level rules you need to understand first:
- There’s a finite number of ways to buff your character’s stats (gear bonuses, food, Mundus stones, etc.), and every time you increase one stat you’re giving up a chance to increase something else. It’s always a trade-off.
- Nearly everything in ESO is designed with points of diminishing returns. This has been discussed at length with regard to Champion Points, but it applies to most everything else, too. This means dumping all your buffs into one stat (crit chance, or max magicka, for example) is never a good idea because not only is it possible for a stat to be too low, it’s also possible for a stat to be too high. High end-game performance is about finding an effective balance between all your numbers.
Step 1: Assess Where Your Build Is At Now
Basic Framework
Major props to Sherman’s Gaming for laying out the build target ranges like this; check out his video on universal build design. His design works for all roles, but here I’m using the numbers as he’s tweaked them to apply to DPS, specifically a mag-Sorc.
The essential trinity of a successful build is sustain, survivability, and power. I’m focusing here on power, but you’ve also got to have the others. You do zero DPS when you’re dead. 🙂
You’re primarily looking to balance 4 stats: Maximum Magicka, critical percentage, base spell damage, and penetration. Other numbers matter (for sustain and survivability, you’ll need adequate Attribute recovery, Max Health, resistances, etc.), but start with these four.
Maximum Magicka: 32K-39K
Your combat damage and crit chance are based partly on your max Magicka; it needs to be a solid number or your build will be weaker overall. However, if you get over 40K, you’re hitting that point of diminishing returns, and the additional benefits of the higher Magicka fall off fast. It also means you probably have a weak spot somewhere else, and/or you could have a higher health or greater resistances. Keep in mind you’ll have food buffs and enchantments to increase this, as well as spell buffs from your party.
Critical Percentage: 55-69%
Hitting a critical strike means the attack’s damage will increase by 50%, which is good. But if your crit chance is super high and your base damage is low, then a low damage number times 50% is still a low number. You don’t need to crit every time to be effective.
Base Attack Damage: 2200-3200
Anything below 2000 is really sub-par, but over 3500 you’re probably sacrificing too much of something else.
Penetration: 12K-15K maximum
Penetration is literally the amount of the enemy’s armor your attack ignores. Exceptions exist, but almost every boss in the game has armor ~18,000. If you increase your penetration higher than your enemy’s armor, those extra points give you absolutely no advantage – you’ve wasted resources, and some other stat is lower than it could be. Penetration is the focus of several armor sets, you can increase it with CP, it’s also affected by base damage and maximum Attribute… and there is no way in-game to see your total penetration value. Is the Spinner’s set worth your time to farm? That depends entirely on what your penetration is and where you need it to be. I recommend getting an add-on that calculates penetration; it is not just a matter of adding up all your bonuses.
Honestly, if you balance these numbers, you’re more than halfway there.
Mundus Stone note: If you can see at this point that one of your numbers is way off, you might want to consider switching Mundus Stones before you continue and see how that changes things. But as a DPS you’ll almost certainly want a Mundus that affects one of those last 3 stats: The Thief (crit chance), The Apprentice (spell damage), or The Lover (weapon & spell penetration). You probably don’t want The Mage Mundus (max Magicka), because it can be raised so many other ways, and you’re pretty much locked in to Max Magicka enchants on your armor.
Step 2: Study Your Weapon Bar
A lot of great players have put builds online, complete with weapon bars, and those are a fine place to start. Slavishly copying the bar may not work for you, but before you remove abilities, you’ve got to understand why they were there to begin with. In order to do that, you’ve really got to learn your abilities thoroughly. I’ll show you what I did, but I’m an academic w/an obsessive streak, so this may look insane to you. You certainly can develop another method, but be sure you’re taking everything below into account.
So… I made flashcards. (Yeah, okay, I’ll wait ’til you’re done giggling.) After they were made, being able to physically lay the cards out and move them around was super helpful. But even before that, just making the cards taught me more about playing a Sorc than months of casting the spells, because I had to think about the effects and how the bonuses were being applied – I realized a lot of my assumptions were incorrect. I made one of these cards for every single ability I could/would put on my weapon bar. If you’re done giggling, lemme show you one:
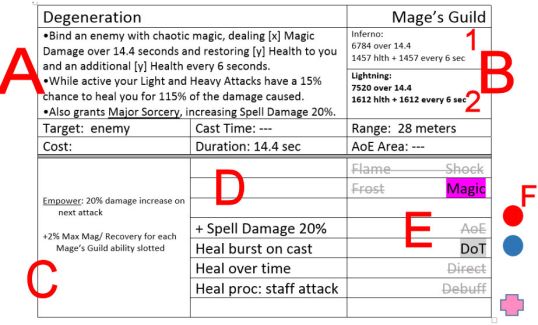
A: The skill line tooltip text for the ability. I copied these off Fextralife (because I know they’re current) and pasted them into the table.
B: These are the specific damage numbers from my weapon bar; those will always be different than the skill menu tooltip. B1 is the damage when using an Inferno staff (Zellfire’s front bar weapon) and B2) a Lightning staff (her back bar weapon).
C: These are the conditional passives that apply to this ability. I say “conditional” because they only apply in certain conditions. (more on that below)
D: These are the buffs of the spell.
E: These are the ability’s categories, which determine which bonuses apply. (more on this below)
F: I organize info visually, so these marks are for ease of sorting. (Red Dot = single target direct damage; Red Circle = AoE dam; Blue Dot = buff for me; Blue Circle = buff for group; Pink Cross = self-heal) To compare my self-heal options, for example, I can gather up the cards with the pink cross and lay them out side by side. When making my dungeon bars, I started with the cards that buff the party. Etc.
Now, let’s dig into all that, starting with conditional passives. These passives affect abilities differently depending on the weapon you’re using or how your weapon bar is set up, or any other variable factor. Go through every passive you have – class, weapon, guild, etc. – and note each effect on the B space of each card that is affected. Here are some examples:
*Daedric Protection (Daedric Summoning line) – gives a 20% health & stam recovery bonus when a DS ability is slotted. (That’s the conditional part.) Note that on every Daedric Summoning card. If you’re building a defense-oriented bar, or you need to increase survivability, then you can look for the cards w/ that note.
*Expert Mage (Storm Calling line) – gives a 2% damage bonus for each Sorcerer class ability slotted. (That’s the conditional part.)
*Magicka Controller (Mage’s Guild line) – gives a 2% bonus to Max Magicka and Magicka Recovery for each Mage’s Guild line ability slotted.
*Might of the Guild (Mage’s Guild line) – casting a MG ability gives a 20% bonus to your next attack spell.
The point of doing this is so when you’re comparing abilities side-by-side, you are aware of the “invisible” benefits of each – you can’t see that Degeneration will give you a 20% damage bonus to your next spell by reading its tooltip, for example.
You don’t need to make note of the passives that are always in effect – a Dunmer has a racial passive bonus to fire and shock damage, but that bonus is already included in the spell’s damage numbers when you pull them off your weapon bar.
The passives (conditional and flat) are why you’re going to use the B space on the card to write down the numbers of the ability once it’s on your bar – you want to be able to compare apples-to-apples. Because those numbers can be affected by other abilities on the bar, you’ll want to clean the bar out and only slot one ability at a time.
And because the numbers are sometimes affected by the kind of staff you use, you’ll want to equip your different staves and write down the numbers for both, in case they are different. (B1 and B2 on the sample card above.)
While you’re writing down damage numbers, take a hard look at the kind of elemental damage being done, and note that as well, but remember to look at the weapon bar tooltip and not the skill line tooltip. You want to note both the kind of elemental damage, and the way it’s applied, because that drastically affects how the bonuses stack.
As an example, here is the skill line tooltip for Destructive Clench:

And here’s the weapon bar tooltip with an Inferno staff equipped:
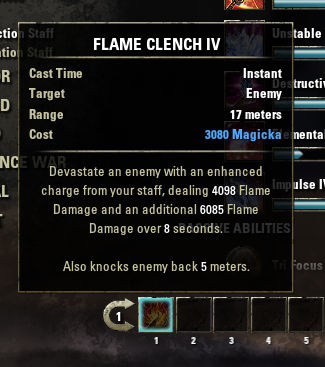
The skill line says the spell does “Magic Damage”, but that’s a generic fill-in. Once you have the ability on your bar with a staff equipped, the ability shows that it does the staff’s elemental damage, Flame in this case. If we switch to a Lightning staff…
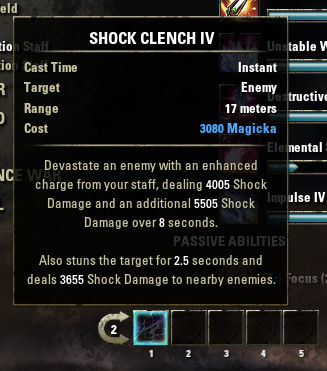
And this is why you’ve got to look at the bar, and not the skill line descriptions. I keep hearing Sorcs tell me they’re wearing War Maiden (which gives a bonus to Magic damage) because their Destruction staff spells are Magic Damage… but they aren’t. The Sorc class skills, the Mage’s Guild line, and the Soul Magic line combined have 5 abilities that do Magic Damage: in the Dark Magic line there are Crystal Shards & its morphs and one of the Encase morphs, Daedric Curse & its morphs (Daedric Summoning), the Entropy morphs from the Mage’s Guild line, and the Ultimate in the Soul Magic line. Sorcs can do Magic Damage other ways – the Fighter’s Guild, and Undaunted lines have some Magic Damage – but that’s a specialty build, not the Sorc default. Probably if you’re running a Sorc you only have 1-2 abilities on your bar that do Magic Damage, if that. If that’s true for you, then War Maiden doesn’t help you much.
Notice, too, that while the Shock staff does less direct and DoT damage to the initial target, the Destructive Clench’s special effect for the Shock staff means it also does additional AoE splash damage to surrounding mobs. Whether or not you want to sacrifice damage on your primary target in exchange for splash AoE depends on the situation and personal preference – but be aware there’s a difference. I didn’t realize that before I made my cards.
Before I move on, here’s that same spell when the bar is filled with Sorc class abilities – remember that 2% bonus per slotted class ability?
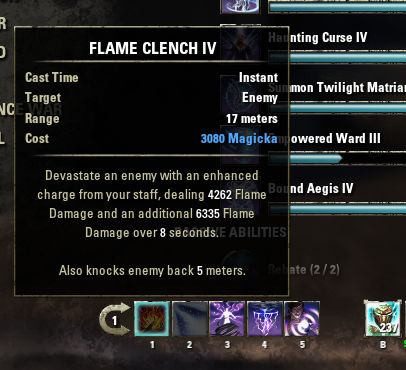
Almost 200 pts higher damage on the initial attack and more on the DoT. This is why I’m recommending you empty your bar when writing down your numbers – other slotted abilities will change them. You’re going to be comparing one ability’s damage to another, and you want clean data.
In addition to the elemental damage, you also want to spend a moment really thinking about how the damage is applied and note that on the card as well. (In space E on my example card.) Is it AoE, direct damage, a DoT, or some combination? Do any of those change depending on the staff, as Destructive Clench does? Note that on the card. Let’s look at Haunting Curse:
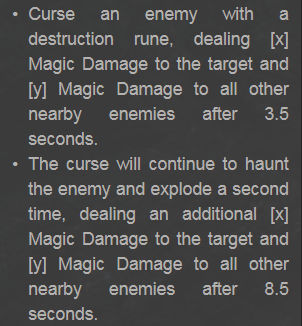
I keep hearing people refer to this as a DoT, and it’s a timed spell, yes. But it doesn’t tick off the damage every second; it is not a DoT. It does single-target direct damage and splash AoE at 3.5 seconds, and single target direct damage and splash AoE 8.5 seconds later. It will not trigger the Skoria set (which procs off DoTs), and it will not get the CP Thaumaturge bonus (a % damage bonus to DoTs). It is affected by the CP Master of Arms, which applies to direct damage.
(If you can keep all these factors straight in your head for all the abilities at the same time while flipping back and forth between them on your screen, that’s fantastic. I could not, hence the flashcards.)
Do this with every ability, then lay out the cards as your weapon bar is now. Now try moving the cards around to maximize the way they interact with the others. Some things to consider:
*Basic Bar Rotation: You want access to a shield, a debuff, a DoT, an AoE, some kind of self-heal, and you must have a spammable single-target attack; 1 ability can fulfill more than 1 of these needs. A good line up to consider is: buff, debuff, DoT, AoE, spammable attack. You can split that rotation over your 2 bars. Once you have all your cards labeled, compare the possibilities in each category. What’s your best self-heal?, what’s your best shield?, what’s your best spammable damage?, etc.
*Do the durations of the abilities flow together in a logical manner?
*Do the spell ranges flow in a logical manner? (Farthest-reaching spells first, then shorter ones as the mobs close on you.)
*Are the passives you have available being maximized?
*Which abilities work best with which staff/bar? (If a spell does more damage w/one kind of staff or the other, is it on the best bar?)
*Are you wasting buffs? You can only have 1 each of the same kind of Major or Minor buff type – so if two of your abilities give you, for example, “Major Sorcery”, they don’t stack – only 1 will be applied. (Looking here specifically at Power Surge and Degeneration, both of which give Major Sorcery, but there are other overlaps.) You can run multiple Majors and Minors if they are different – Major Sorcery and Major Resolve, for example.
*What kinds of “specialty” situations do you encounter? Do you want a standard bar set up with solo-bonuses only, and then another with group benefits for dungeon runs? Do you farm a dungeon where the mobs have a resistance to some of your favorite spells, so you need a back-up rotation? Do you want a bar for trash mobs and a different one for elites? Do you want a bar set-up that’s defensive and another that’s purely offense? So on and so forth – you have to decide what effect you are prioritizing at any given time, which has to be determined by how you play, and then select the abilities that add to that effect. (Reminder: the AlphaGear add-on lets you set up all these specialty bars and then switch them out with a hotkey click; you don’t necessarily have to switch gear at the same time.)
The flashcard system might not be the way you want to work, but I swear, if you take the time to go through each one of your abilities in any similar manner, you will have a much better grasp of how they function as an integrated whole.
Side-bar: This was the point in my build work where I realized my dream of running Zellfire as a fire mage was not going to happen in end-game terms. Yes, she can carry an Inferno staff, and the Destro staff abilities will manifest as fire. However, the Inferno staff is almost always at a penalty in comparison to a Lightning staff – the Storm Calling line has a passive that gives a flat bonus to all shock damage, fcol; there’s no comparable bonus for flame damage.
But besides that – look at the passives again. You get a 2% damage bonus for every Sorc ability you have slotted, and 2% magicka max/recovery bonus for every Mage’s Guild ability slotted. You get no bonuses for slotting Destruction staff spells. Unstable Wall of Elements (Destro line) and Liquid Lightning (Storm Call line) are both DoT AoEs, but putting LL on your bar gives you a 2% damage bonus to every other ability on the bar, whereas Unstable Wall gives you… nothing. (And Unstable Wall can’t be aimed at a spot across the room.) Once you lay out all the spell’s factors on the cards and compare them side by side, you’ll understand why the meta players slot Liquid Lightning as their DoT AoE.
Compare all your similar abilities side-by-side, pick the strongest, and you will have a much more effective weapon bar.
Step 3: Your Gear
NOW we’re ready to look at gear. Take a look at your foundation numbers from step 1. What do you need to bolster; what can you give up?
The first time I did this, my crit rating was 86%, but my spell damage was 1400 – too much crit, not enough base damage. At the time, I was wearing Mother’s Sorrow, which anyone will tell you is a great set, and it IS… if you need to add crit. I didn’t; my Mother’s Sorrow went into storage, and my DPS went up.
Next, take a look at your weapon bar abilities. What kind of damage do you do most? What kinds of procs can you trigger most frequently?
(proc = a percent chance for a bonus, triggered by a specific event; see sets listed below for examples)
If you are playing a staff-wielding Sorc, you have 11 equipable slots: 7 armor, 3 jewelry, 1 weapon. If you are wearing a Monster set, that leaves 9 slots, which means you’ll get only 1 of the 5-piece bonuses, and up to the 4-piece bonus on a second set. So the first question you need to ask is what 5-piece bonus do you need most? Let’s look at a few of the bonuses from some commonly used sets:
Set Name: (2nd, 3rd, 4th piece bonus) 5th pc bonus
*Julianos: (crit, max mag, crit) constant increased spell damage
*Burning Spellweave: (max mag, spell dam, crit) procs increased spell damage off fire damage
*Netch’s Touch: (max health, max mag, spell damage) constant spell damage bonus to shock damage
*Scathing Mage: (max mag, crit, crit) procs increased spell damage off crits
*Overwhelming Surge: (max mag, spell dam, spell dam) procs AoE shock damage off class abilities
All fine sets, but which is best for you depends on where your stats are and what abilities you use.
As I said earlier, Zellfire really needed to up her spell damage, so I went to ESO Academy’s excellent set page and filtered for spell damage sets, specifically looking for sets with 2 spell damage bonuses. Since I am, by god, going to run her as a fire mage come hell or high water, I started with Burning Spellweave – she will always use an Inferno staff, and I have the bad habit of constantly spamming light staff attacks. Neither of these things is ideal, but regardless, they are both true, it’s how *I* play that character. Which means BSW is a good set for her; my steady stream of light Inferno attacks means I’m constantly getting a chance to proc the huge 5th piece spell damage bonus the set gives (and in fact I do see the proc come up in every fight). A LOT of the choices I make for Zellfire are about trying to maximize the fire mage potential as best as I can, but I acknowledge she only ever get so good as a “fire mage” before she tops out. She’ll never break 30K, and will probably not break 25K.
I have another mage, Umbra, who is a lightning mage. I am min-maxing Umbra’s build for top effectiveness with no regard for role-play issues – she will soon be my end-game dungeon-runner. She uses 2 Lightning staves and Storm Calling abilities, and for her I am farming Netch’s Touch. I don’t mind that the first bonus is max health; her max Mag is higher than it needs to be, the spell damage bonuses stack well, and frankly, I am not always so good about getting out of the red circles. (I ❤ my healers!) At some point, when I’m a better player and learn to friggin’ dodge when I should, maybe learn to maintain my shields (hope springs eternal!), then Netch’s may no longer be the set I want, but I picked it partly because I know my own limitations as a player. (Know thyself, young Padawan.) In the meantime: survivability is one of your build’s three pillars.
The other thing to consider is how easy it’s going to be to acquire those 5 pieces. Julianos is the easiest Sorc set, because you can just go craft it. Done. (You also have more control over the appearance when you craft one of the sets.) The next easiest are zone sets, b/c you can solo-farm those pieces. And most difficult are the group-dungeon-drop sets, because you’ll need patient friends to farm those.
So look at all possible 5th-piece bonuses and decide that set first. Your next step is picking what set will fill up those other four slots. You can’t make jewelry, so at least one of your sets needs to be a drop-set, not crafted. And you’ll need 2 staves, which you can craft (if one of your 2 sets is crafted), but if you want 2 looted sets, then settle in for some long-ass farming, b/c neither jewelry nor weapons are common drops, and you’ll need multiple pieces of each.
Also keep in mind you can have staves of different types – if you’re wearing 4 pieces each of two sets (8 slots) as armor and jewelry, and use your staff as the 5th piece, equipping two different set staves will mean you get a different bonus depending on which bar you have up. For example: with 4 pieces of Burning Spellweave and 4 of Netch’s, with an Inferno BSW staff on your front bar and a Netch’s Lightning staff on your back bar, you’ll get the BSW proc when using the Inferno staff, and switching bars to the Netch’s staff gets you the 5th-piece shock damage bonus. If you go that way, be sure your weapon bars are set up to maximize the respective benefits.
Since low spell damage is the bane of my existence on both my mages, I’m trying to get 4 pieces of Overwhelming for those last 4 slots, b/c it gives 2 spell damage bonuses. It is entirely possible that when I eventually get all the Best-in-Slot pieces I’ll find my spell damage is high but something else is too low, in which case I will switch out the 4-piece set for something different. Yay, set farming! Gotta catch ’em all!
When you’re looking at sets to fill out those last 4 slots, keep in mind it’s the 5th-piece bonus that defines the set; a lot of sets have identical bonuses for 2nd, 3rd, and 4th pieces. I chose Overwhelming b/c I already some pieces in my inventory, but Martial Knowledge from Craglorn gives (max mag – spell dam – spell dam) as its 2, 3, and 4 piece bonuses – the exact same benefits as Overwhelm. There’s a LOT of overlap like that. If a set everyone hates (like Martial Knowledge) gives you the 4-piece bonuses you want, then go after those, b/c you’ll be able to pick those pieces up easy and cheap. (You will, however, have to get used to ignoring the ppl who tell you you’re Doin’ It Wrong when you ask for “bad” set pieces.)
Before moving on, double-check your gear bonuses and procs, and your weapon bars again – are you stacking your proc triggers? Zellfire runs the Skoria Monster set, which procs off DoT damage, so I made sure I had as many DoTs on my weapon bars as was feasible, to have as many chances as possible per second of getting that proc. If you’re running Netch’s, you want shock damage on your bars, etc.
Also keep in mind that you may want a 2nd set of 4 pieces of trial armor like Infalliable Aether, (which give a bonus on dungeon mobs only) that you can switch out when you’re going into a group dungeon or trial. When you use that set, you might need to adjust your weapon bars to account for changes resulting from switching those 4 pieces.
This is what I mean by the word “interplay” in the title of this post. The point I want to make above all else is that these bits and pieces all work together – change one piece and it causes a ripple effect. You absolutely should take a look at the masterclass builds online – Alcast, Sherman’s Gaming, ESO Academy, etc. But you should also understand your own limitations in using those builds, and you should understand how changes you make impact the rest of the build.
Who doesn’t love a 3-dimensional jigsaw puzzle, amirite?
Step 4: Mundus Stones & Champion Points
This is your last chance to tweak your foundation numbers, and I saved these for last b/c they are the easiest and fastest to change. With your weapon bar set up and your gear in place, look at your stats again – max magicka, spell crit, damage, and penetration. What’s low, what’s high?
Mundus Stones:
Divines gear will amp your Mundus stone choice. If your Max Magicka is too low, you might want to switch out a couple of those Divines pieces for Infused. If one of your numbers is still way too high/low, you might want to look at switching stones.
Champion Points:
Now go into your CP and use your points to shore up the weak spots. Three major points to make here:
- Champion points round down, always.
A 14.8% bonus is exactly the same as an 14.1% bonus: 14%. If you have an 14.1% bonus and you put in 12 more points to get it to an 14.8%, you’ve straight up wasted 12 points. - All CP perks have a severe point of diminishing returns.
Putting 100 points into any perk is a waste, because the scale is exponential, not linear. Going from a 0 to a 1% bonus might take 2 CP, but on the same perk, going from 99 to 100% might take you 20 points. Is that extra 1% worth all that resource investment? No: those 20 points will give you a far more significant bonus elsewhere. Most of the meta-gamers recommend an absolute max of ~76 points in only one perk (if any), a very few in the 40-50 range, and most others you’re serious about will be in the 23-36 range. - Match your CP perks to the spell damage type you are actually doing.
Pull out your Weapon Bar Flashcards again (which I totally know you made, ‘cuz it’s super useful and not-at-all-crazypants, right?), and take a look at what types of damage you do. Not flame vs. shock vs. magic, but AoE vs. Direct vs. DoT. Your biggest point investment should be in the perk that adds a bonus to your most common attack type, and go down from there.
As a DPS magicka-Sorc, these are the perks you want to hit the hardest, with emphasis on the perks that benefit your most frequent attack types.
*The Mage – The Ritual – Thaumaturge = DoT damage bonus
*The Mage – The Atronach – Master of Arms = bonus to direct damage
*The Mage – The Atronach – Staff Expert = bonuses with light/heavy staff attacks
*The Mage – The Apprentice – Elemental Expert = Flame, Frost, Shock, and Magic damage bonus
*The Mage – The Apprentice – Spell Erosion = bonus to spell penetration
*The Mage – The Apprentice – Elfborn = bonus to spell critical chance
*The Thief – The Lover – Arcanist = increases magicka recovery
Note: I do NOT mean buy only these, I mean prioritize these. (And again, I’m concentrating on the power of your build here, but you also need survivability and sustain.)
If you do decide dump 70+ points in one perk, make damn sure it bumps the majority of your attacks – Elemental Expert is a good choice, if you must. If, like me, you are wearing the Skoria helm and therefore have loaded your weapon bar with DoTs, make sure you invest heavily in Thaumaturge. If you lean on single-target burst damage, Master of Arms should be a large investment. Because I compulsively spam my staff light attacks I heavily invested in Staff Expert, but I don’t recommend that tactic. (Don’t be me, kids!)
Step 5: Test and Practice
Now head over to the target dummy and test that all the procs and bonuses are affecting the things you think they affect.
And while you’re at the target dummy, practice for a while. Then practice some more.
More than anything other single factor, combat performance is affected by your keyboarding skills. When you learn to play the piano, or when you first learn to type, you have to practice until your fingers know the motions without conscious input from your brain – you’ve to get to the point where you make the motion without *thinking* about it. Muscle memory, it’s called.
Video game combat is the same deal, and the target dummies are helpful for practice b/c you don’t have to worry about other factors, like, for example, dying. Ideally, you want your fingers tapping the buttons without thinking through the motion, or even what key it is. This is always going to be my Achilles’ Heel. I can type ~100 words a minute, but my hands are tiny and hitting the number keys is awkward – I cannot reach the 1 with my little finger, and I end up taking my hands completely off the letter keys to use my weapon bar abilities, which is a problem when I suddenly need to dodge. That means my natural top-end is going to be lower than others can hit, and it’s also why I’ve spent so much time researching build design – I’m compensating as best I can for weak keyboarding.
Step 6: Prepare To Do It All Over Again
My very last bit of advice is this: always remember that fixing your build is not a one-time deal because the rules are always in flux. There is no “done” in an MMO, and that’s a good thing. But if you keep your eye on your foundation numbers and adjust your build as patches come through, and always buff the types of attacks you actually use, you’ll remain consistently able to pull your own weight in group play.
Happy hunting!
(P.S. I have proof-read this thing all week, but if you see some piece of info that is incorrect, please let me know and I’ll fix it.)
